
I love using Scratch to teach children and others about coding. By using blocks instead of syntax, it has simplified coding to make it accessible even for very young children. I love that it has eliminated the need to learn some of the more difficult aspects of coding such as where curly brackets and parenthesis go when a person is first learning about things such as variables, control flow, and loops.
There are a few areas where I wish Scratch hadn’t simplified quite so much. I understand the need to keep things simple for young learners, but in some cases, over simplification inadvertently leads to more complex situations. The primary example of this is the limitation of the IF THEN ELSE to only one ELSE statement.
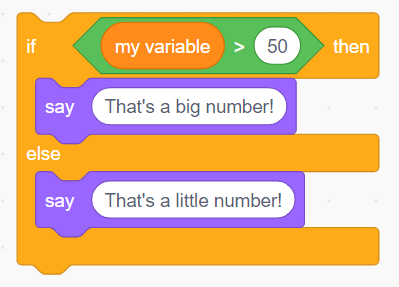
For those not familiar, the IF THEN ELSE statement is used to control which parts of the code run based on variable conditions – often times input from the program’s user. (This is called a conditional logic or control flow.) The programmer can put in several alternate pieces of code – which one runs depends on the values currently in the program. For example, if a number is greater than 50, then the program will say it is a big number. Else, the program will say it is a little number.
The problem is that programs often have more than two alternatives that might need to run. There could be three, ten, or even a hundred alternatives. In most programming languages this is handled with an ELSE IF statement (or alternatively a SWITCH statement). If the first condition is not met, the program will check the next one. If that one is not met, it will continue checking down the list until a condition is met or it reaches the end of the list.
To illustrate this, I’ve written a simple program that has four conditions. The user is asked to enter a letter. A different emoji is returned for each letter – including a sad face in case none of the requested letters was used.
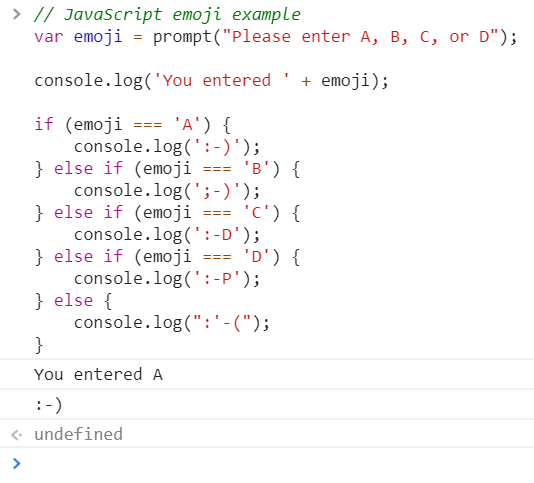
Here is the program in a language called JavaScript. The variable emoji contains the user input. The first IF is just written with “if” but each subsequent one is written as “else if”. Finally, an “else” catches anything that didn’t match earlier.
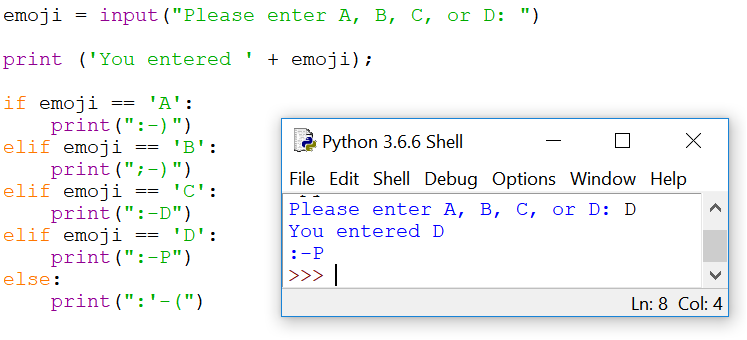
Here is the same example in a language called Python. This one uses the slightly more hard to read syntax of “elif” which is short for “else if”.
This syntax is clean and easy to read. You can follow the logic easily and determine what will happen based on the value of the variable.
Unfortunately, Scratch lacks the ability to have multiple conditionals in a single IF statement. There is a workaround called the Nested If statement. Essentially, this is just a regular IF THEN ELSE statement, however, instead of putting something like a message to be displayed to the screen in the ELSE, you put another IF statement. This can be repeated over and over again until you have all your conditionals. This can get very complicated very quickly.
Here is the same program written in Scratch. Notice how each ELSE statement has another IF THEN ELSE statement inside.
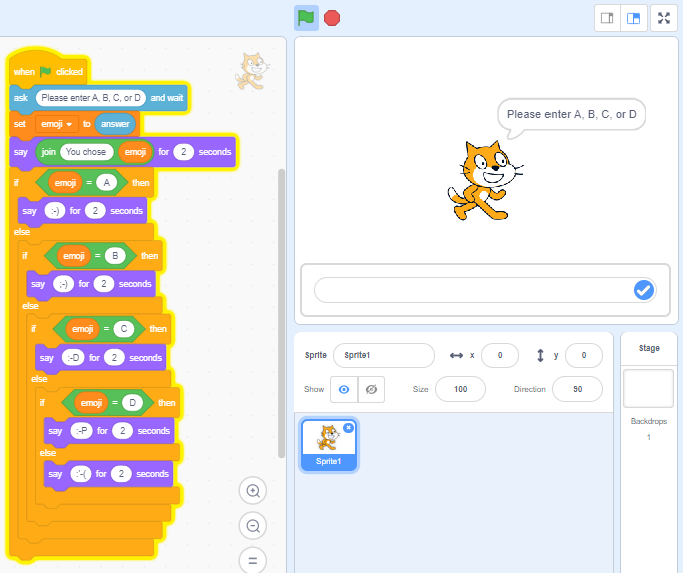
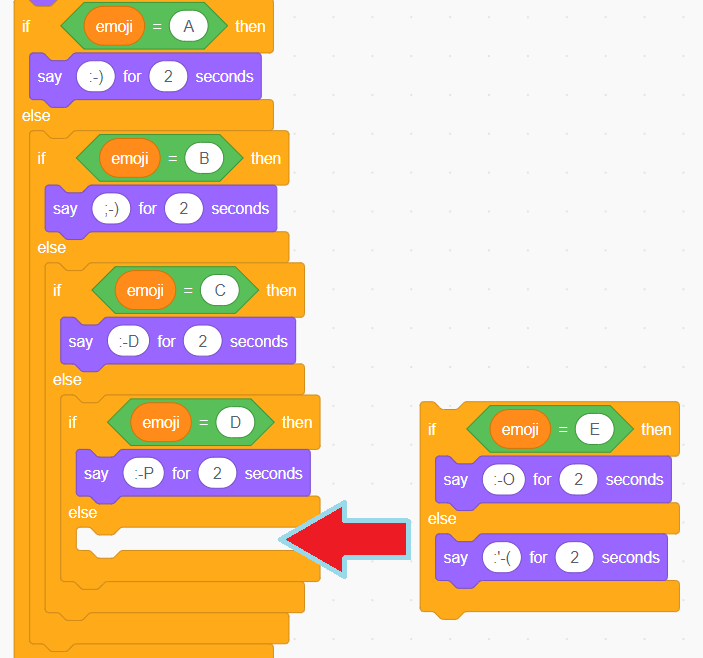
What if you want to add more letters and emojis to the code? To add another condition into the logic flow, you drag a new IF statement into the ELSE statement of the last IF statement. This can be repeated as often as needed.
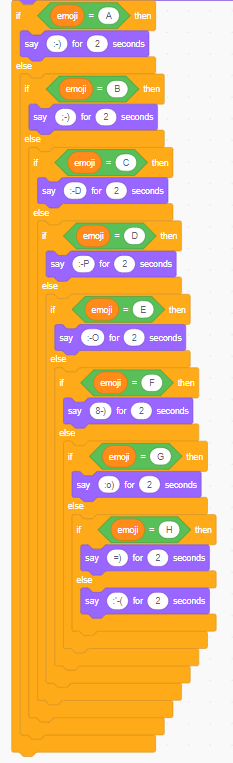
While not problematic at first, it can become overwhelming in short order. In this example, we display a separate emoji for letters A through H. (Also out sad face is displayed if none of those letters were used.)
Look at the bottom of this code block – there are 8 block closures all in a row. Imagine if we had an emoji for all 26 letters!
This can be very confusing, especially for younger children learning to code. It’s also a fairly archaic way to code – more reminiscent of programming languages from the 80s then those of today.
This has been discussed in Scratch forums in the past but does not seem to have generated much interest.
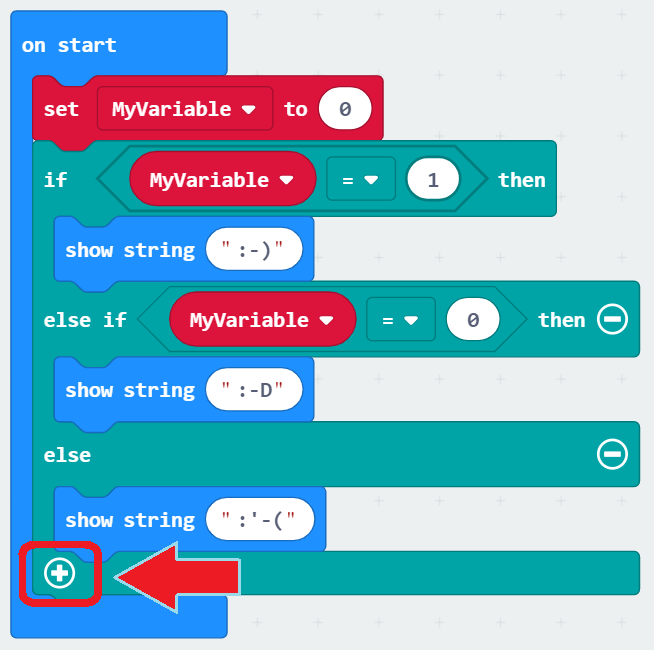
Other block languages have added this functionality in a very eloquent way. Here’s an example from Microsoft’s MakeCode. The user simple clicks the plus sign at the bottom of the block to add a new else if statement.
To keep things a little easier to read (like the MakeCode example), I like to use an alternative method for keeping track of multiple IF statements. I use a variable to track if an IF Statement has been used, which allows me to keep the various IF statements separate. This is quite a bit easier to read.
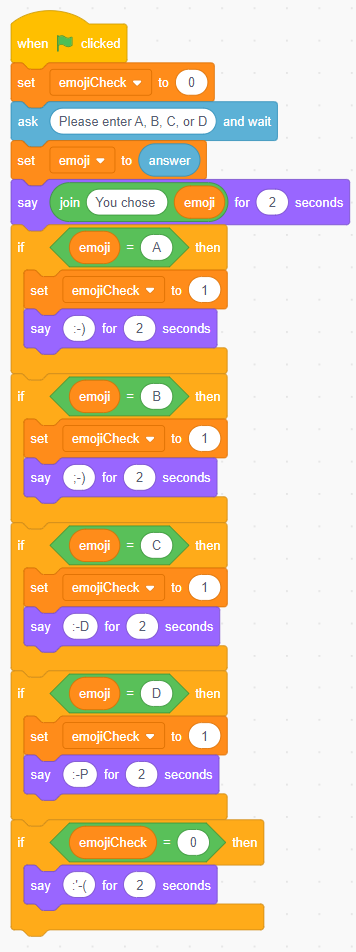
Here is the original program again, but now using a variable (emojiCheck) instead of multiple nested IF statements.
The emojiCheck variable is initially set to zero but if any of the IF conditions are met, it is changed to one.
The final IF statement checks for the value of emojiCheck. If it’s zero, that means that none of the previous IF conditions were met and the sad emoji face is displayed. If any of the previous IF statements were met, this block does not execute.
It is not perfect, but I think this Variable If method may help new users learn the code without the confusing aesthetics of a nested if statement.
All of the code in this example is available to those interested.
Emoji Code Examples
The Scratch programs are also shared with additional comments included in the code.
Nested If example in Scratch
Variable If example in Scratch
Edit: I added a few more examples from other programming languages in another post: Additional Examples of Nested If Statements.